Game Programmer
Ninja FPS Controller
After having spent several semesters working on teams to build some really cool games, I decided I wanted to start something solo so that I could explore specific concepts that interest me. That became this project, a FPS controller that explored first-person movement mechanics that I had an interest in. So, over the span of about 8 weeks I worked on this project a little each day. This page will go into fairly deep dive of how I implemented different mechanics and my thought process behind each bit. If you want to see more overviews of projects and how I contribute as a team member I recommend you check out my other projects, such as Drosera.
The core Mechanics that were implemented:
tesdt
Basic Movement
First things first, I had to give the player the ability to simply move using WASD. Now I've used the original Unity input system plenty of times, so I thought I'd take this opportunity to try out the new Unity Input System. Child a camera to a capsule, add the Player Input component, and create a few custom functions to be called by input system *boom* we have a moving player!
Er... well sort of. There are a couple of issues. First off the player moves through objects like its a ghost. This is since I'm using transform.Translate(), not ever detecting collision. So there our a few solutions to this. One, I could add a rigidbody and make my movement physics based, but then the controls won't be as tight as I want then and I'm at the mercy of Unity's physic's engine. Two, I could write up my own entire custom code to detect collision and properly slide off them depending on my angle and velocity, but that seems a bit much. Or lastly, I can just throw a CharacterController component on my player and let Unity do everything I just mentioned. And with that we have proper collisions.
Now for the matter of moving the camera with my mouse. I set up another function to work with the input system and get the mouse control Vector2. Using that Vector2 I rotate the player accordingly. Since we don't want the player to be able to look 90 degrees up and down, or even worse flip themselves upside down, I set up a custom clamp to prevent that. Here's that code:

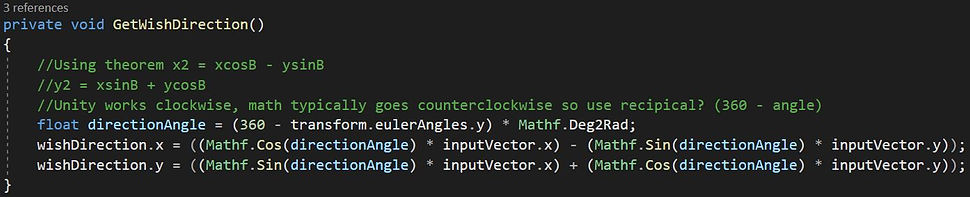
However, now when the player moves forward they don't move in the direction of the camera, but always forward in world space. To remedy this I need to do some math to rotate the input vector with the rotation of the camera.
Finally, we can add some gravity to our player. Then when we know the player is grounded and space is pressed provide an upwards velocity for a jump. Here's the initial result:
Strafe Jumping
So the logical step would be to work on a more common movement mechanic right? Something like sliding maybe. Is that what I did though? Nope. I said to myself I want to work on this more niche movement tech called Strafe Jumping. Strafe jumping is a movement tech originally created and popularized by Id Software's Quake series where the player continuously bunny hops and as they move they move there mouse in one direction and their movement keys the same way. For instance, move the mouse slowly right and press W and D. Some great resources I used to learn how this works mathematically and in programs are the following:
After following the first link pretty closely and some trial and error I got strafe jumping working, for the most part.

This works fairly well, however if the player alternates from strafe jumping left to right and vice-versa there is a slightly jarring speed loss. Proper strafe implementations should maintain the speed, allowing the player to alternate direction which will overall gain speed. I left it as is for awhile but eventually I did go back and on a separate branch reworked the acceleration code. This time taking direct inspiration for the Quake 3 code on github. This fixed the issue and now the strafe jumping fully works.
I'm happy I got the mechanic working and the process was a great learning experience! However, by doing acceleration this way the controls feel slippery and there isn't as much air control as I want. So I went back to the other, mostly working implementation as it just felt tighter. Even with that I'm heavily considering cutting jump strafing entirely as I don't believe it contributes to the end result of the project I want to build. Not to mention it can cause some inconsistent air acceleration which interferes with more precise parkour.
Dashing
The next mechanic implemented was the ability to dash. The principle of the dash is to enable the player to move very quickly in a desired direction for a short distance. This allows the player to close gaps they couldn't normally jump to. Also this gives more evasive options that will come important down the line once combat encounters are created.
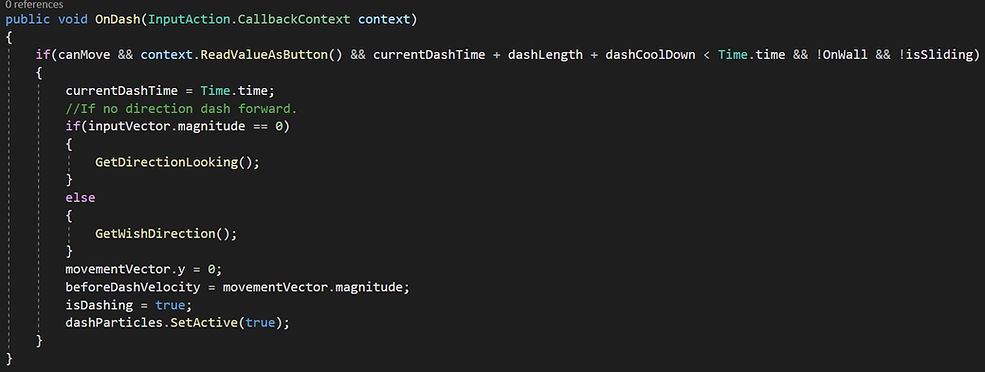
The dash itself is fairly simple to implement. When the dash button is pressed set y velocity to 0 and then move the x and z of the character to a constant dash velocity in a the inputted direction for a set period of time. Additionally, multiple checks need to occur when the player tries to dash. Such as not letting a dash to occur while still dashing, wall running or sliding (which was added later), or during cooldown.
By having a dash cool down this prevents the player from spamming dash, infinitely moving at dash speed. However, with a cooldown this needs to be conveyed to the player so they know when they can or can not dash. So I created a simple UI that works as a fillable gauge that depletes when a dash is used and fills up as the cooldown time counts down.

By having a dash cool down this prevents the player from spamming dash, infinitely moving at dash speed. However, with a cooldown this needs to be conveyed to the player so they know when they can or can not dash. So I created a simple UI that works as a fillable gauge that depletes when a dash is used and fills up as the cooldown time counts down.
Additionally, to show the speed of a dash I added wind lines that appear in front of the camera during the time of the dash. These wind lines were created through the Unity particle system.
Wall Running
Another mechanic I knew I wanted to add from the get go was the ability to wall run. Wall running adds a whole new level of verticality that can be incorporated into level design and combat encounters. Most importantly, it always feels awesome to do.
To implement wall running, first I needed to know when the player is on a wall. The Unity character controller provides the ability to know when the controller is touching something below, above, or at its sides. So first thing I did was when the character controller was touching to the sides I would freeze the y velocity. This seemed to be a step in the right direction, but once you were on a wall you were stuck on it.
Next, I needed to provide the ability to jump off the wall so you don't stay stuck forever. When the player jumps from a wall, ideally they move slightly away from that wall. But in order to do that I needed to know if the wall was on the player's right or left. The issue was that the character controller could detect collisions, but not return what it was colliding with. So I instead added raycasts that come off the left and right of the player. This enabled me to get the specific wall objects that the player would run on. Then I was able to find the normal of that object to use in my calculation to apply velocity to jump from the wall.
At this point the core of the wall running was working. To make it feel a bit better when you run I had the camera tilt away from the wall slightly, to give an effect of running sideways.
Note: The full code for wall running is too long for an image and Wix doesn't have a tool to properly show code on this site, so I recommend you view the code on Github. The wall running code starts on line 168.
Sliding
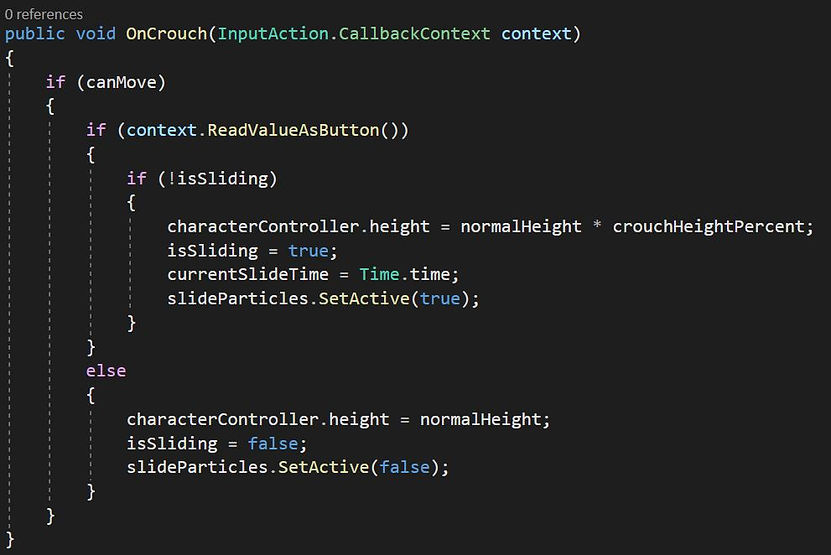
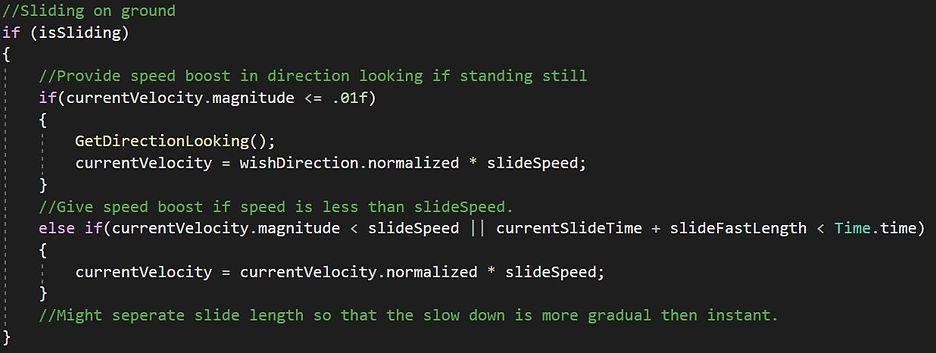
This mechanic is fairly straightforward. When the player presses slide the player's height reduces and they slides across the ground. If the player is moving at a speed less than a threshold the slide will increase their speed to that threshold. If they are above that threshold when they slide their speed will be maintained for a set time, then it is reduced to the threshold. This provides the flexibility of using sliding as a tool to gain speed quickly or to maintain higher speed for a short bit.
Kunai Projectile
Now that I've laid the ground work for movement, it was time to add the shooting part of the FPS. I could simply go with some sort of gun of course, but since I started this project I always imaged the player as some sort of ninja. This lead me to instead of shooting anything, the player throws a kunai knife. Eventually there will be other weapons, but the kunai is the first and most basic weapon.
Initially I started by quickly moving a kunai projectile from the location bottom right of the camera to the desired point of impact using a raycast from the center of the camera. The projectile would then stop when it detects a collision. However, there was a couple of issues with this. One, the projectile would sometimes not detect a collision due to the speed it was going at and just go through objects entirely. To remedy this I had the projectile raycast from its current location to its last location each frame and if there was anything caught by the raycast it would stop. This made the projectile collision a lot more reliable. The other issue was that the projectile was being thrown at a weird angle from the right of the screen. This caused situations where the projectile could get stuck in a nearby object to the right of the player. By having the projectile appear at the center of the camera fixed this. Additionally, I had the projectile delay the time it would be rendered slightly after spawning, which creates the illusion that the projectile is actually coming from the right hand and not the center screen.
Lastly, I needed something to throw the kunai knives at. So a set up the structure for objects to be damageable and used that to create a target enemy. Then to add some feedback for when the player hits an enemy I created a red hit marker that briefly appears around the crosshair. Also when an enemy is killed they spawn a unity particle system VFX.
Speed Course
Wanting to better test how my mechanics work together (and because I like speedrunning) I created an obstacle course, inspired by the Gauntlet in Titanfall 2 by Respawn Entertainment. This course has several different sections, each to challenge the different movement mechanics. In addition to the obstacles I added 10 target enemies throughout the course for the player to shoot.
Wanting to do a bit more than just have it be a physical level to run around in I wrote a script to make a it a proper speed course with a timer and everything. The course will track your time from the start line to the end. It also has checkpoints so that if the player falls they don't have to start back over. Lastly, I split the course into two modes, the regular course focused on moving fast, and a challenge course where you have to destroy all targets. The player can run these courses as many times as they want and the game will keep track of their best time for them.
Regular Speed Course:
Challenge Speed Course:
Once I was satisfied with the course and was done tweaking movement for now I decided it would be good to get some feedback from others. I put together a very basic main menu, pause menu, and a simple tutorial. Nothing permanent, but could work as the base structure for these going forward. Then I distributed a build of the project to some friends and to a couple game dev organizations I'm a part of. After I receive feedback I'll make adjustment to the movement that I feel appropriate. Might even refactor entire mechanics such as acceleration calculations or how wall running works.
I plan on continuing to work on this project going forward. At this point I will likely start building towards an actual game idea with this movement at this core. Additionally, I plan to bring others on to aid me as I feel fit.
If you read through this whole page, thanks for sticking around! If you would like to try the speed course yourself feel free to download it below (links to a google drive download). Or feel free to view the full code on github!
Development Update
Hello, I'm adding this short update to say that I did continue this project for a few more months afterwards. I made movement adjustments, visual updates on movement, and a couple new weapons and mechanics. I plan to add breakdowns and videos of these changes sometime soon. But if you are curious to see some of what I've done weekly updates on this project can be found on my twitter.